How to Crochet a Cake Roll | Free Step-by-Step Pattern + Video Tutorial

Hello!
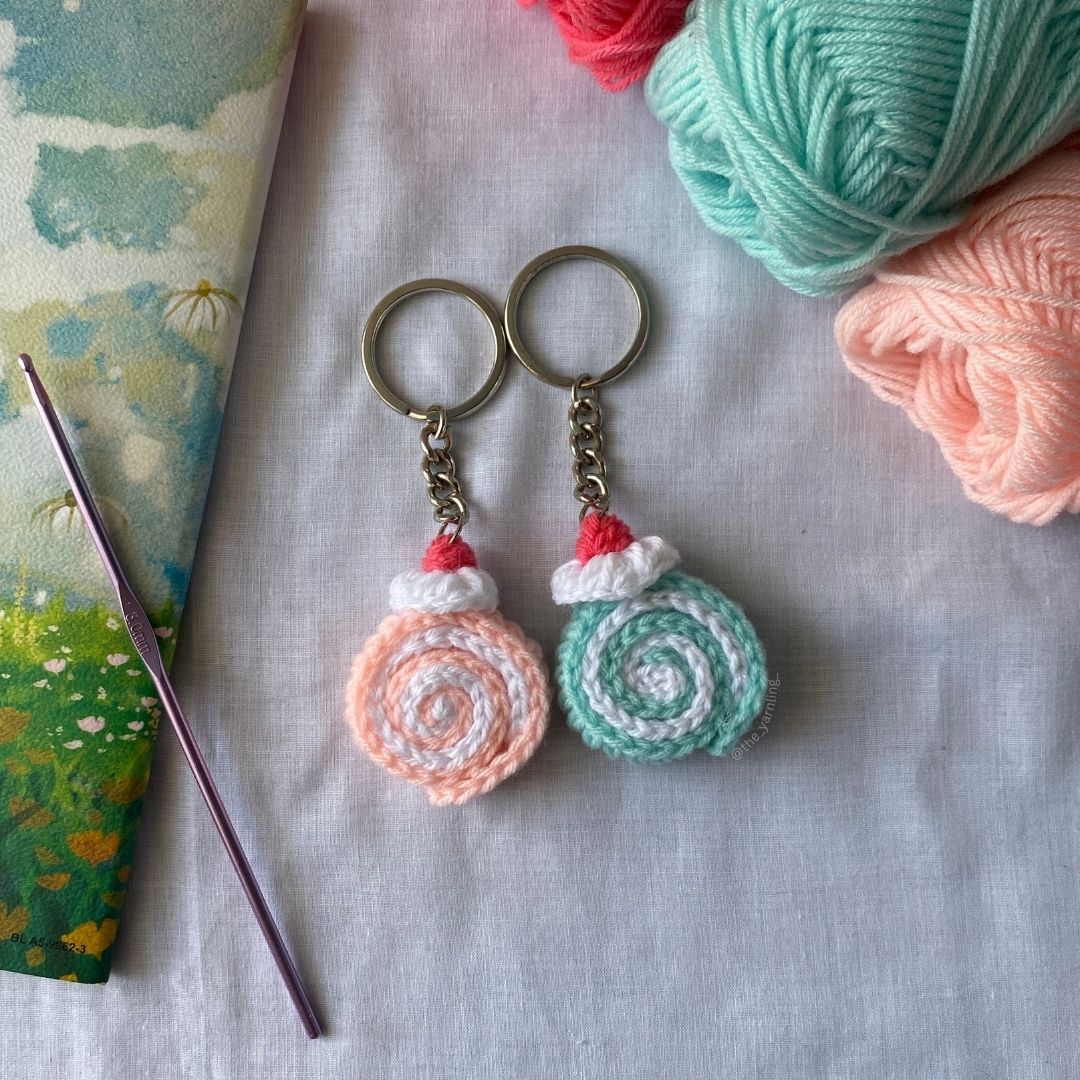
This is a pattern for an adorable crochet cake roll! Designed to look like a delicious Swiss roll topped with cream and a cherry, it's a fun project for crocheters of all levels.
There is a detailed tutorial for the same on my YouTube Channel which you can check out on this link.
Let's get started!
Materials:
- Yarn – Weight-3 acrylic yarn in 3 colors
- Hook – 2.5mm hook
- Scissors
- Yarn needle
- Hot glue
You can use this pattern with any type of yarn with the recommended hook size
Abbreviations:
mr – magic ring
st – stitch
ch – chain
dc – double crochet
sc - single crochet
sl st – slip stitch
Special Stitches:
puff st - [yarn over, insert the hook, pull up a loop] x 2, yarn over, pull through all the loops.
bobble st - [yarn over, insert the hook, pull up a loop, yarn over pull through 2] x 5, yarn over and pull through all the 6 loops, ch1.
Pattern
The Base (In Blue):
Ch45
Round 1: dc in 2nd ch and every ch afterwards - (44 dc total)
Ch1 and fasten off, don’t leave a tail unless you intend to sew it in the end.
The Cream (In White):
Ch35
Round 1: dc in 2nd ch and every ch afterwards - (34 dc total)
Ch1 and fasten off.
The Cream on Top (In White):
Magic Ring and ch1
Round 1: 5 sc in MR - (5 sc)
Round 2: ch1, [puff st, puff st, ch1] x 5 - (10 puff st)
Check “Special Stitches” for “puff st”.
Ch1 and fasten off, don’t leave a tail unless you intend to sew it in the end. I did sew this part.
The Cherry on Top (In Pink):
Ch3
Bobble st into 3rd ch from the hook
Check “Special Stitches” for “bobble st”.
Ch1 and fasten off, don’t leave a tail unless you intend to sew it in the end.
Assembly:
- Take the white inner cream piece and the blue (or outer colored) cake base piece.
- Line them up starting from the fasten-off points for both.
- Place the white piece on top of the outer piece, making sure the edges align neatly.
- Use hot glue to secure the starting edge of the white piece to the outer piece, this will help hold it in place as you roll.
- Apply a thin line of hot glue between the layers as you gently roll them together like a Swiss roll.
- Continue adding hot glue bit by bit while rolling to ensure it stays firmly in place.
- Once it's fully rolled up, apply a little more glue at the tip/end edge to seal the roll.
- Take the crocheted cherry and attach it to the center of the white circular cream swirl using either hot glue or by sewing it on with the yarn tail.
- Then, glue or sew this cream-cherry combo to the top of your cake roll, slightly off-center or centered as per your design.
- You can sew this part for extra security, or just hot glue it in place, I sewed mine.
- If you'd like to turn it into a keychain or charm, you can:
- Add a keyring directly, or
- Crochet a small chain on top and attach the ring through that.
And with that, you’re done making your little cake roll!
I'd love to see if you make one of your own.

Tag me in your work and I'll share it on my page on Instagram @the_yarnling_
You can find a lot of detailed Crochet Tutorials on my YouTube Channel - The Yarnling
You can buy this pattern on Ravelry
You can buy this pattern on Ko-fi
You can support me on Ko-fi and find more fun patterns!
.png)


Comments
Post a Comment